 which allows you to re-arrange
items or drag them out of (or back into) the main window completely.
This can come in handy when you want to give the maximum possible screen
size to the main drawing window.
which allows you to re-arrange
items or drag them out of (or back into) the main window completely.
This can come in handy when you want to give the maximum possible screen
size to the main drawing window.[ Back to main page | Tutorial | A practical example ]
This is a bare-bones tutorial that will hopefully introduce you to all the features of xdraft. Along the way, we will re-create some of the drawings done for the Miatascope project.
These instructions were written with version 0.10 in mind. The user interface is likely to change between now and when xdraft is released in its final form, so be prepared for these instructions to become inaccurate over time.
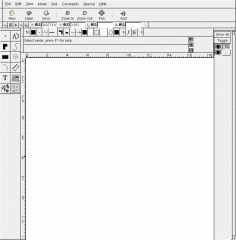
Start xdraft with no arguments to start with a blank canvas.
Note that many interface elements (menubar, toolbar, etc.) are attached
to a "grip"  which allows you to re-arrange
items or drag them out of (or back into) the main window completely.
This can come in handy when you want to give the maximum possible screen
size to the main drawing window.

This is a pretty conventional menu bar. The File menu contains the usual "New", "Open", "Save", "Save As", etc. options, plus a link to the Set Scale dialog.
Likewise, the View menu contains the usual options to control what user interface elements are displayed. As of this writing, the "Save View" options are not yet implemented.
The Mode menu allows you to switch among the basic drawing modes. The menu items mirror the tool palette on the left side of the interface.
The Grid menu is used for configuring the snap grid. The Set grid origin item does not currently work, but when it does, it will allow you to pick any point on the display and the grid will be recentered at that point. The Set grid... option brings up a dialog which allows you to completely configure the grid. This is discussed in detail below.
The Constraints menu is used to set a wide variety of coordinate constraints that give xdraft its real power. Since many of the constraints are meaningful only relative to the current cursor position, most of the time you want to access these menu items via keyboard accelerator. Constraints are discussed in detail below.
The Special menu contains special macro operations. At the moment, it only includes an "Add Border" item which adds a solid border around the drawing area of the page.

The toolbar contains the usual New/Open/Save/Zoom items common to many graphic programs.
In addition, there's a Pan tool which allows you to grab the drawing and drag it within the window.
Note that you can also pan the drawing by dragging the rulers at the edges. In addition, you can use Control + left mouse button to pan at any time.

Constraints are used to enter data and align elements in the drawing with other elements in a nearly unlimited variety of ways. For more details, see Using Constraints, below. Constraints are the key to the power of xdraft, so you definitely should not skip that section.

The attributes bar controls the attributes of newly-created drawing elements. Many of the icons are non-obvious, so it often helps to hover the cursor over the icons for a moment to see what they are.
See the section Attributes, below for a more detailed look.
The next two lines on the display provide text feedback. The first line indicates what action is expected next. The second line displays status and error messages.


The mouse prompts tell you what the different mouse buttons will do. These are subject to change depending on shift and control keys.
For example, the prompt on the left tells you that the left mouse button will define a point and the other two buttons will do nothing.
The prompt on the right is displayed whenever the Control key is pressed, and it indicates that the left mouse button will pan the canvas and the other two will zoom in or out.

The Mode buttons mirror the entries in the Mode menu. These select the primary drawing modes: Point, Line, Polygon, Spline, Rectangle, Circles and ellipses, Arcs, Dimensions, Text, Images, Edit, and Compound. These modes are all described below.

Each primary drawing mode usually has several submodes, which are selected via buttons specific to each primary mode. Shown here are the Line submodes: Line, Polyline, Parallel, Perpendicular, Break, Connect, Trim 1, Trim both, Break, and Clip.
Submodes are explained in detail in the primary mode sections.

Note: this section will change soon when the layers interface is rewritten.
This dialog (along with the drawing layer attribute) allows a drawing to be divided into logical layers. The layers control the order in which elements are drawn. Lower numbers are drawn on top of higher numbers.
Initially, a drawing contains only layers 50 and 999. Layer 999 is "special" in that it's used for construction lines (see below). New layers are created automatically the first time they're referenced in the drawing layer attribute.
The "eye" buttons control which layers are visible. The "Show all" button makes all layers visible while the "Toggle" button toggles the visibility of all layers.
The layer-number buttons to the right of the "eye" buttons select the current drawing layer. Only one layer at a time can be selected.
Xdraft has several forms of data entry. Depending on the current interaction, the user may be asked to enter the coordinates for a point, specify an angle or a length, or select any of a vertex, edge, or entire object.
In general, the first prompt line will tell you what is needed, e.g. "Define second point".
Mixed operations are possible. For instance, the dimension function allows you to either define a point or select an edge.
Common interactions are:

The most common form of data entry is to simply define a point on the drawing canvas. This is usually done either by pointing to the desired location with the cursor, and clicking the left mouse button, or by manually entering coordinates, e.g. by typing x2y3.
Point definition may be modified by the use of constraints (below).
It's also reasonable to define a point using mixed methods. For example, you might use the cursor to point at a location on the canvas, then enter just the X coordinate from the keyboard with e.g. x2, leaving the Y coordinate alone.
There are many interactions that involve dragging out an object. For example, to place a line segment you would click on one point, move the cursor to the second point and click again. A "rubber-band" line will follow the cursor as you perform the second operation, to show you where the line will go.
It is almost never necessary to hold down a mouse button to drag something. Just click once at the start and once at the end. The only notable exception to this rule is when you are selecting objects where you have the option of clicking on a single object or dragging a rectangle across multiple objects.
Many elements, such as Polygon, are defined from a series of points. To enter multiple points, simply add the points one-by-one as above, and then use the middle mouse button to indicate that you're finished.
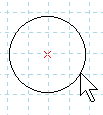
When drawing circles and ellipses, you will be asked to provide a radius. This is done by either defining the radius with the cursor, or entering it into the length input field with e.g. L2.
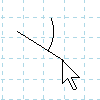
In several drawing operations, such as arc drawing, angled ellipses, and so on, you will be asked to define an angle. This is done by either sweeping the angle with the cursor, or entering it directly into the angle input field with e.g. a30.
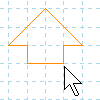
In most editing operations, you will be asked to select an object. This is done by pointing to objects with the cursor. The object nearest to the cursor will be be highlit in orange. It will be displayed in red once selected.
Not all elements are always selectable. For instance, if the operation requires that you select a line, curved objects will not be selectable.
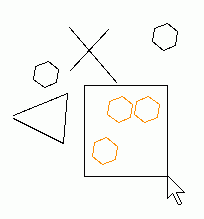
In some cases, e.g. Delete mode, multiple objects may be selected by dragging a rectangle around them.

Many interactions select just a single edge from an element.
Most data entry operations can be cancelled with the Escape key.

The Constraints interface is the key to the power of xdraft, so you should definitely read this section.
The Constraints interface is modeled after the way you would draw on a conventional drafting board. That is, the locations of various elements in the drawing are often determined by the locations of previous elements.
For example, on a drafting board, you might run a straight edge horizontally or at a specific angle from an existing point and measure out a specific distance to place the next point. The Constraints interface provides the same functionality: Elements can be snapped to a drawing grid, drawn at specific angles, snapped to endpoints of other elements, placed at specific distances and so on.
 This button turns off all constraints, allowing points to be placed
anywhere.
 This button turns "Grid snap" mode on or off. When on, all endpoints are
snapped to the nearest grid location (subject to other constraints).
Use the View > Show grid menu item to display the grid on the drawing surface. Note that if the grid is very fine or the drawing has been zoomed out, xdraft may not be able to display all of the grid lines. Other visual feedback will show you the actual grid intersections.
Note that "Grid Snap" and "Show Grid" are independent. It's possible to have grid snap enabled without displaying the grid, and it's possible to display the grid when grid snap is off.
Use Grid > Set grid... to set grid parameters.
 Try it: Turn on grid snap and make the grid visible.
Select Lines from the Mode menu or the palette on
the left. Move the cursor around in the drawing canvas and observe the red
x that hovers near the cursor. This mark shows you
where the line endpoint will be when you click. Go ahead and draw a line
by clicking two different locations.
 This button turns "Angle snap" mode on or off. When on, all line segments
are constrained to the current angle constraints. (Default angle
constraint is 15 degrees.) This is similar to the "Manhattan" or
"mountain" geometries provided by other drawing software, but is more
general.
The angle constraint may be changed via the Constraints > Set angle constraints... menu item. Any interval and any base angle may be selected.
 Try it: Turn on angle snap and and draw a line as
above. See how the second endpoint is constrained to specific angles from
the first endpoint.
Hint: Setting the angle interval to something that does not divide evenly into 360 degrees is possible, but usually not very useful.
 The vertex snap (aka "vertex gravity") button causes coordinates to snap to
nearby vertices, making it easier to connect drawing elements together.
 Try
it: Draw a line segment. Turn on vertex snap. Move the
cursor close to an endpoint of the line segment. Observe the red x that appears at the endpoint. This is where your
next line will begin if you click now.
 This button turns on relative coordinates. This means that the X and Y
coordinates are displayed and entered relative to the base point.
The "base point" is the point to which the current point is considered relative. A typical example is a line segment: When drawing the second endpoint, the first endpoint serves as the base point.
When there is no meaningful base point, the coordinates are absolute coordinates.
Try it: Turn on relative coordinates. Move the cursor into the drawing window. See how the coordinates are displayed the same as before. Click on the first endpoint of a line segment. Now observe that the coordinates are displayed relative to the first point.

The coordinate input fields serve several functions:
When freehand drawing or just moving the cursor around in the drawing window, the coordinate boxes show the current X-Y coordinates.
If any constraints are in effect, the coordinate windows show the X-Y coordinates determined by the constraint.
The coordinate windows also allow you to enter coordinates directly. To make data entry easier, typing the x key moves keyboard focus to the X entry, and the y key moves keyboard focus to the Y entry.
Try it: Go to line mode. Move the cursor into the drawing region and type x2y2<enter>x3y3<enter>. See how you've drawn a line from (2,2) to (3,3).
Simple numeric expressions, such as 1+2/3 may be entered into coordinate (and length and angle, below) input fields.
 The small padlock icons represent
coordinates that have been locked to their current value. This is
usually activated by typing Shift+X or Shift+Y. Once a coordinate has
been locked, it will not change in response to cursor motion. This can
be an excellent way to transfer locations from one part of the drawing
to another.
 Try it: Enter line mode. Move the cursor
anywhere in the drawing window and press Shift+X. Observe that
the X padlock icon is now active and that a red x
is now tracking the cursor location and that its X coordinate never
changes.


 Try it: Enter line mode and draw a line if there isn't
already one on the canvas. Turn on vertex snap
(above). Move the cursor close to an endpoint of your line until the
red x appears to indicate that your coordinates
have been snapped to the endpoint. Press Shift+Y to lock
the Y coordinate. Move the cursor away and observe how the red x remains level with the endpoint where you locked the
Y coordinate. Place the new endpoint anywhere, then press Shift+Y
again to unlock the Y coordinate. Repeat the procedure with the other
endpoint of the original line (or anything else on the canvas if you like)
and place the other end of your new line segment.

The length data entry field is active any time there is a base point (e.g. when drawing the second point of a line segment).
The length field displays the current length of the element being drawn. This can represent the length of the current line segment, the radius of the current circle, the diagonal of the current rectangle, or so on.
The length parameter may be directly specified by entering data into the length data entry. The L key will shift keyboard focus to the length field to make data entry easier. The sequence Shift+L will lock the current length.
Try it: Enter line mode. Click on the first endpoint of the line. Draw out the line segment but do not click the second endpoint. Observe the value in the length data entry changing as you draw out the line. Now enter L5 and observe the length of the line change accordingly. Now hit the Enter key and your line is drawn.
Try it: Enter rectangle or circle mode. Start to draw an element and enter the length as above. Observe the rectangle diagonal or circle radius change accordingly.
Try it: Enter rectangle mode. Start to draw a rectangle and type Shift+L. The diagonal of the rectangle is now fixed. Move the cursor and observe the interesting way the rectangle behaves.

The angle data entry field is active any time there is a base point (e.g. when drawing the second point of a line segment).
The angle field displays the current angle relative to the base point.
The angle parameter may be directly specified by entering data into the length data entry. The A key will shift keyboard focus to the length field to make data entry easier. The sequence Shift+A will lock the current angle.
Try it: Enter line mode. Click on the first endpoint of the line. Draw out the line segment but do not click the second endpoint. Observe the value in the angle data entry changing as you move the cursor. Now enter a30 and observe the line snap to a 30-degree angle. Now hit the Enter key and your line is drawn.
Try it: Enter rectangle mode. Start to draw a rectangle and type Shift+A. The shape of the rectangle is now fixed.
Try it: Enter rectangle mode. Start to draw a rectangle and type a45Shift+A. The rectangle is now a square.

In most mechanical drawing, you generally find yourself creating construction points and lines which are used to reference and align other elements. To make this easier, xdraft has a "construction line" button in the constraints bar. This button simply temporarily changes the drawing layer to the construction layer and changes the pen color to orange. Unclicking the button returns the layer and color to their previous values.
 Try it: Enter line mode. Press the Construction button
in the constraints bar. Draw a line. Unclick the Construction button.
Observe that the line is drawn in orange and that it disappears if you
hide the construction layer in the Layers dialog.
Basic grid usage is described above in the section on constraints. This section describes the grid in more detail.
The Grid button  in the constraints bar enables or
disables grid snap. The Grid snap option in the Constraints
menu does the same thing.
Visibility of the grid is controlled in the View menu. Grid snap and grid visibility are independent.
The default grid has a spacing of 0.5 units and an origin at 0,0. This can be altered with the Grid > Set grid... menu item. There are several options for configuring your grid:
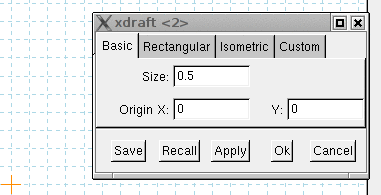
The basic grid has a square aspect ratio and an arbitrary origin. The "Size" parameter sets the grid spacing.

A rectangular grid allows different spacing on the X and Y axes.


The isometric grid produces a grid with axes along the 120° and -120°
axes, suitable for doing isometric drawings.

The custom grid allows you to define a grid with axes aligned on any angles, with any spacing, and with any origin.

A point is the simplest drawing element in xdraft, consisting of a single point.
Point attributes are pen color and point type.

This submode allows you to define single points on the canvas. The simplest way is to simply use the mouse to point at the canvas and click the left button. More useful methods include entering X-Y coordinates (see below) or otherwise making use of constraints.
A common use of points is as reference points for further drawing. In this case, you may want to place the points in the construction layer.
Try it: Enter point mode. Enter single point submode. Point the cursor at various locations on the canvas and click. Type the characters x4y4<enter>.

The Relative Point submode allows you to define a point relative to any other point (or in fact, any other element).
This is a two-step process. First, you are asked to define a base point. You could simply click on the canvas as with single points, but this isn't actually very useful. Instead, you should have some constraint engaged (typically vertex snap) which you use to specify a particular point on the canvas.
Having defined the base point, you then either use relative coordinates or some other constraint to specify the second point relative to the first.
On the surface, this may not seem terribly useful. The main purpose of relative points is to provide a base point which enables several constraints that depend on it.
 Try it:
To place a point 1 unit to the right of a line endpoint:
Draw a line segment if there is not one already on the canvas.
Turn on vertex snap.
Turn on angle snap.
Enter Relative Point submode. Select the endpoint of your line segment to
establish the base point. Move the cursor to the right; note that angle
snap is keeping the angle exactly zero. Enter L1<enter>
to set the distance to 1.

The Intersection submode allows you to define points at the intersections of other elements. To use, simply select two objects. Points will be created at all of the intersections of the two objects.
If the objects do not intersect, or xdraft does not know how to compute the intersection, the message "0 points created" will be shown in the status prompt line.

The Limits submode adds points to all of the "limit" points of a selected object. For line segments, this means the endpoints. For polygons, it means all of the vertices. For circles, it means the center and all of the 90° points.

The Series submode places a series of evenly-spaced points between two base points.
To use it, you define two points and then enter the number of in-between points you wish to add. For example, if you choose just one point, that will be the midpoint.

The Space submode places a point between two others, an arbitrary distance between them.
To use it, you define two points and then enter a fraction into a dialog. If you enter e.g. 0.5, then the new point will be at the midpoint between the two other points. If you enter 0.2, the new point will be 20% of the way from the first point to the second.

The Grid submode prompts you to enter a base point, an angle, the overall dimensions of the grid, and the number of points in X and Y. It then generates a grid of points to your specifications.

A line is a simple line segment with two endpoints. A polyline is a line with multiple endpoints. Lines are the simpler case, but a polyline has the advantage that the ends are joined cleanly (see the corner type attribute, below.)
Line attributes are pen color, line width, line type, corner type, cap type, arrows, and arrow type

Simple line segment comprised of a single segment between two endpoints.

A polyline consisting of multiple segments.
To create: enter Polyline mode and define points. Use the middle mouse button when finished.

A single line segment created parallel to another.
To create: enter Parallel mode and select any line segment, rectangle side, or polygon edge. Move the new edge into position.
The distance between the base edge and the new edge can be entered in the length field. Positive numbers will place the new edge on one side while negative numbers will place it on the other.
Normally, the new edge is moved on a vector perpendicular to the base edge, but you can change this by entering a new angle constraint (e.g. a180) or by unlocking the angle altogether (Shift-A).

Not implemented yet.

Break a polyline into individual line segments. Not implemented yet.

Join multiple lines into one polyline. Not implemented yet.

The "Trim 1" submode trims a line segment so that it ends at the intersection with another edge. This command will also extend a line segment if necessary.
To use: select the line segment to be trimmed. Select the part of the line that is to be removed. Select any other object for which an intersection can be computed. The line will trimmed at the intersection point (or extended, if appropriate.)
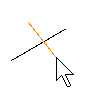
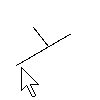 Try it: Draw two intersecting line segments. Enter "Trim
1" line submode. Select the line segment to be trimmed. Select the
trimming segment.

Similar to "Trim 1", except that this version trims both elements. Both elements must be line segments.

Similar to "Trim 1", except that instead of trimming the line segment, it splits it into two smaller line segments.

A polygon is series of line segments which begin and end on the same vertex. In other words, it's a closed polyline. Polygons can be hollow or filled in a number of ways. The bounding line segments can have color and all the other attributes that a polyline has. The fill color can be different from the edge color.
Polygon attributes are pen color, line width, line type, corner type, fill color background color fill type and fill pattern

A polygon defined by arbitrary vertices.
To create: Enter Polygon mode and define points. Use the middle mouse button when done.

A regular polygon defined by center, radius, and offset angle.
To create: Enter Regular Polygon mode and define the center. Next, specify the radius and angle by placing the cursor. You can also specify radius and angle by setting the length and angle values directly.
Use the polygon sides attribute to change the number of sides.

A spline is a smooth curve that follows a path defined by a number of points.

An open spline is similar to a polyline in that it starts at one endpoint, passes through a number of points, and ends at another.
Try it: Go to Open Spline mode and start placing points. Use the middle mouse button when done.

A closed spline is similar to a polygon in that it starts and ends at the same point. When you use the middle mouse button to finish the curve, the last point is joined to the first point.
Try it: Go to Closed Spline mode and start placing points. Use the middle mouse button when done.

A rectangle is a four-sided polygon.
Rectangle attributes are pen color,
line width,
line type,
corner type,
fill color
background color
fill type
and
fill pattern

This submode allows you to define a rectangle based on two corner points.

This submode allows you to define a rectangle by specifying its center and one corner point.

Circle and ellipse attributes are pen color,
line width,
line type,
corner type,
fill color
background color
fill type
and
fill pattern

This submode allows you to define a circle based on center point and radius. Radius may be specified directly by entering a value into the length data box.

This submode allows you to define a circle by defining two diametrically-opposed points.

This submode allows you to define a circle by defining three points through which the circle must pass.

This submode allows you to define an ellipse by defining the center point and a "corner" point. The axes of this ellipse are always parallel to the X and Y axes.

This submode allows you to define an ellipse via two opposite points.

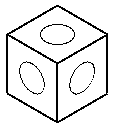
This submode allows you to define an isometric ellipse based on a center point and major axis (radius and angle).
Isometric ellipses have an aspect ratio intended to be good for representing circles in an isometric drawing. For best results, angle snap should be turned on in order to align the major axis with 0, 60, or -60 degrees.
The X and Y coordinate entries can be used to define the center point. The length and angle entries can be used to define the major axis.

This submode allows you to define any possible ellipse.
To create: Define the center point. Define the major axis (radius and angle). Then define the length of the minor axis.
The X and Y coordinate entries can be used to define the center point. The length and angle entries can be used to define the major axis. The length entry can be used to define the minor axis.

Arc attributes are pen color,
line width,
line type,
corner type,
fill color
background color
arc type
fill type
and
fill pattern

This submode allows you to define an arc based on its circle center, radius, and start and stop angles.
To create: Place the center point of the arc. Then draw out the radius and initial angle. Then sweep out the second angle. If the circumference is on the wrong side, the middle mouse button will flip it.

This submode allows you to define an arc by defining three points through which the arc will pass.

This submode is almost identical to the one above, except for the order in which the points are defined. This mode allows you to specify the endpoints first, and then any in-between point.

This submode allows you to define an arc by selecting two edges and specifying a radius. The resulting arc will be tangent to the two edges.
If the edges involved are line segments, they may be trimmed at the arc endpoints to complete the fillet.


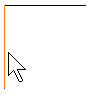
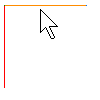


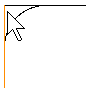
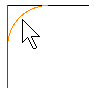


Don't forget: you can always specify the arc radius directly by entering it into the length field.

Dimension attributes are pen color,
line width,
line type,
and
font

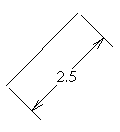
This submode allows you to define a dimension either between two points or along an edge.
To create: Define two points or select an edge. Drag the label to the desired location.


This submode allows you to define a dimension that measures the horizontal distance between two points or along an edge.

This submode allows you to define a dimension that measures the vertical distance between two points or along an edge.
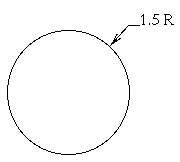

This submode allows you to draw the radius of any arc or circle.
To use: Enter Radius submode. Select an arc or circle, or define two points representing center and radius. Place the dimension text.

This submode is almost identical to the one above, except that the diameter is displayed instead of the radius.

This submode allows you to draw the angle in degrees between any two lines.
To use: Either a) select two intersecting lines, b) define a center point and two angles, or c) select a line and define an angle. Then place the label text.

Text attributes are pen color,
font,
justification,
and
text angle

This submode allows you to enter text and place it anywhere in the drawing.
To use: Enter Text submode and type text. The text will appear alongside the cursor. Place the text anywhere on the drawing.

This submode is nearly identical to Text submode except that the text angle attribute is also in effect.

The middle mouse button will bring up a character set dialog containing a copy of the current font, allowing you to select special characters not found on your keyboard.
In addition, xdraft uses the same multi-key compose mode that the vi editor uses, and even reads your .exrc file to use your custom digraphs.
To make use of compose mode, type Control-K and then two letters from the table below:
NS  |    !I  ¡    !!  ¡    Ct  ¢    Pd  £    lb  £    $$  £    Cu  ¤
xo  ¤    Ye  ¥    BB  ¦    SE  §    ':  ¨    co  ©    -a  ª    a-  ª
<<  «    NO  ¬    --  -    Rg  ®    'm  ¯    __  ¯    DG  °    oo  °
+-  ±    2S  ²    22  ²    3S  ³    33  ³    ''  ´    My  µ    Mu  µ
PI  ¶    pp  ¶    .M  ·    ..  ·    ',  ¸    1S  ¹    11  ¹    -o  º
o-  º    >>  »    14  ¼    12  ½    34  ¾    ?I  ¿    ??  ¿    A!  À
A`  À    A'  Á    A>  Â    A^  Â    A?  Ã    A~  Ã    A:  Ä    AA  Å
AE  Æ    C,  Ç    E!  È    E`  È    E'  É    E>  Ê    E^  Ê    E:  Ë
I!  Ì    I`  Ì    I'  Í    I>  Î    I^  Î    I:  Ï    D-  Ð    N?  Ñ
N~  Ñ    O!  Ò    O`  Ò    O'  Ó    O>  Ô    O^  Ô    O?  Õ    O~  Õ
O:  Ö    *X  ×    xx  ×    O/  Ø    U!  Ù    U`  Ù    U'  Ú    U>  Û
U^  Û    U:  Ü    Y'  Ý    TH  Þ    ss  ß    a!  à    a`  à    a'  á
a>  â    a^  â    a?  ã    a:  ä    aa  å    ae  æ    c,  ç    e!  è
e`  è    e'  é    e>  ê    e^  ê    e:  ë    i!  ì    i`  ì    i'  í
i>  î    i^  î    i:  ï    d-  ð    n?  ñ    n~  ñ    o!  ò    o`  ò
o'  ó    o>  ô    o^  ô    o?  õ    o~  õ    o:  ö    -:  ÷    :-  ÷
o/  ø    u!  ù    u`  ù    u'  ú    u>  û    u^  û    u:  ü    y'  ý
th  þ    y:  ÿ
See the vim(1) documentation for more information.

Editing in Xdraft is different from what you may be used to. In other software packages, you would enter a selection mode, select the object(s) to be operated on, and then choose an operation, such as "delete", "move", etc.
Xdraft saves a few keystrokes and mouse operations by providing a number of edit submodes. To use them, you choose the submode and then click on the objects to be operated on.
For example, to delete objects, you would enter Delete submode and start clicking away.

This submode allows you to delete objects on the screen. To use, enter this submode and start clicking.
You can also select groups of objects to be deleted by dragging a rectangle across the screen. Any objects entirely within the rectangle will be deleted.

This submode allows you to copy objects on the screen.
To copy a single object, enter Copy submode and select the object.
To copy a group of objects, drag a rectangle to enclose them. (Not implemented yet.)
(Alternative: To copy a group of objects, make a compound out of them and copy the compound.)
While dragging the newly copied object(s), all constraints are available.

This submode allows you to move objects on the screen.
To copy a single object, enter Move submode and select the object.
To move a group of objects, drag a rectangle to enclose them. (Not implemented yet.)
(Alternative: To move a group of objects, make a compound out of them and move the compound.)
While dragging the newly copied object(s), all constraints are available.

Not implemented yet.

Not implemented yet.

Not implemented yet.

Not implemented yet.

Not implemented yet.

Not implemented yet.

Not implemented yet.

Not implemented yet. Use Line Trim 1 mode to trim line segments.

Not implemented yet. Use Line Trim 2 mode to trim line segments.

This submode makes objects temporarily invisible. Used to hide construction lines or any other element you want to temporarily remove from the view.
To use: enter Hide submode and start clicking away.
Multiple objects may be hidden by dragging a rectangle around them.
You may find it more convenient to use layers for this purpose.

The opposite of Hide. This submode allows you to bring hidden objects back into view.
To use: enter Show mode. The display is changed to show you all previously-hidden geometry (and hide the visible geometry). Simply click on objects to make them visible. When you leave Show mode, all of the previously-hidden geometry will be visible again.

(This section will change in the near future as this interface is revamped and modernized.)
A Compound (also known as a group) is a collection of objects brought together into a single object. When a compound is created, it can be acted upon as if it were a single drawing element.
Compounds are very powerful entities. They allow you to manipulate large numbers of objects as a single unit.
In addition, compounds make xdraft run more efficiently. Boundary checks for redrawing and pick selection run far more quickly when entire groups of objects can be tested at once.

This submode allows you to create a new compound. To use, enter Create Compound mode and start clicking on objects to be added to the compound. Objects which have already been added to the compound will be displayed in gray and will not be pickable.
You can also select groups of objects to be deleted by dragging a rectangle across the screen.
While you work, a red border will be drawn around the bounds of the compound so far.
When finished, click the middle mouse button to complete the compound.

This submode allows you to break compounds back into their component pieces.
To use, enter Break Compound mode and select compounds to be broken. Objects which are not compound objects will be displayed in gray and will not be pickable.

This submode allows you to add objects into existing compounds.
To use, select the compound to be modified, and then start selecting objects to add to it. Use the middle mouse button when done.

This submode allows you to remove objects from existing compounds.
To use, select the compound to be modified, and then start selecting objects to remove from it. Use the middle mouse button when done.
While you work, objects which are not part of the current compound will not be displayed. Objects will disappear from the screen as you remove them from the compound.

This submode allows you to operate on the contents of a compound.
To use, select the compound to be modified, and then leave compound mode to edit it.
If the compound contains other compounds inside of it, you can click on those as well to edit them.
Objects which are not compounds will be displayed in gray and will not be pickable. Once you have opened a compound, objects outside of it will not be displayed until you close it again.

This submode allows you to close the currently-open compound.
To use, click the mouse anywhere on the canvas. If the compound was inside another open compound, you can click again to close the enclosing compound, and so on.
Once the outermost compound is closed (or there was no open compound to begin with), the cursor will change to a "not" symbol to indicate that there are no more compounds to close.

The attributes bar controls the attributes of newly-created drawing elements. Many of the icons are non-obvious, so it often helps to hover the cursor over the icons for a moment to see what they are.
 The layer button selects the current drawing layer. (The initial value is
50). Click on this button to bring up a dialog which will allow you to
enter the new layer. For more information, see layers,
below.
 The color button selects the current drawing color. (The initial value is
black). Click on this button to bring up a dialog which will allow you to
enter the new color. The color can also be set to "none", which is useful
if you want polygons with no borders.

 The point type button selects the point type. (The initial value is
a dot). Click on this button to bring up a menu which will allow you to
select the point type.
 The line width button selects the line width.
Line widths are specified in printers' points. See notes, below.

 The line type button selects the line type. (The initial value is
solid). Types are: solid, dot, centerline, hidden, dashed, phantom,
dashdot, cutting, and break. Most of these are standard
drafting styles.
 The corner type button selects the corner type. (The initial value is
miter). Types are miter, bevel, rounded.
This attribute is most meaningful when lines are fat.
 The cap type button selects the line end type.
Types are "butt", "not-last", "round", and "projecting".
This attribute is most meaningful when lines are fat.
 The arrow button selects the end-of-line arrows. Default is no arrows.
Values are "none" "beginning", "end", "both".

 The arrowhead type button selects the arrow type. Default is simple. One
example is shown here.
 The fill color button selects the color for filling polygons and other
solid shapes.
The initial value is black.
Click on this button to bring up a dialog which will allow you to
enter the new color. The color can also be set to "none", which is useful
if you want hollow polygons.
 The background color button selects the background color for filling
polygons and other solid shapes. The initial value is white. Click on
this button to bring up a dialog which will allow you to enter the
new color. This color is used when a non-transparent fill pattern
is selected.
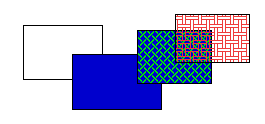
 The fill type button selects the fill type for polygons and other solid
shapes. The default value is no fill which results in hollow shapes.
Other values are solid fill, pattern fill, and transparent pattern
fill.
Sample fill patterns are shown on the right. Left to right, they are: no fill, solid fill (blue fill color), pattern fill (blue fill color, green background), and transparent pattern fill (red fill color).
 The pattern button allows you to select a fill pattern. The default is no
fill. The built-in patterns are taken from the Fig drawing program. Later
versions of xdraft will have a larger selection.
 The arc type button controls how solid-filled arcs are closed. The two
options are chord or pie-slice.
 The Polygon Sides button allows you to set the number of sides to a regular
polygon. The default value is six.
 The Font button allows you to select a text font.
Font heights are specified in printers' points. See notes, below.
 The Justification button allows you to select text justification for
multi-line text.
 The Text Angle button allows you to select the text angle.
Note that line widths and font heights are specified in printers' points (1/72.27") and are independent of the the units used in the drawing. For this reason, you should use the File > Set scale menu item to set your drawing units and scale factor before you start designing. Otherwise, your line widths and text sizes won't look right.
Note that printers' points are slightly different from the values used in Postscript, which uses 1/72" for a point. Xdraft converts for you when writing Postscript files. You would have to draw text nearly 2 inches high for the difference to add up to even one point. A future version of xdraft may switch to Postscript points instead.
[ Back to main page | Tutorial | A practical example ]